First, you must purchase your beekeeping equipment. Do not wait until spring to purchase your hive kits. Many places are sold out or back logged in the spring so you must order your hives between November and March.
A common type and amount of honey bees to order is a 3 pound package with an Italian queen and she is mated. For a few dollars extra, you can have your queen marked. It is a good idea to have your queen marked. This makes it easier to find your queen when you do hive inspections and allows you to keep track if your queen has been replaced (superseded) by the hive. The superseding queen will not have a mark.
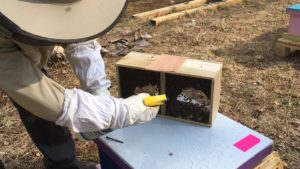
Bees come in a box is equipped with a sugar water dispenser and a cage to keep the queen separate from the bees.
To prepare for the arrival of your bees, or if you are picking them up here, you will want to purchase a new spray bottle and mix sugar water, one part water to one part sugar. Do not use old spray bottles that have been used with other chemicals as this could make the bees sick or kill them. Have your new spray bottle ready when your bees arrive.
Try to keep the package in a shaded or dark place in the car or truck. If you use a truck, try to avoid excessive wind damage that may occur if you place your bees in the bed of your truck. If you have to travel a long distance at interstate speed, and the bees are in the bed of your truck, place something around them, protecting them from the wind, while also providing sufficient air flow. Bees must have air to breathe just like us!
Sometimes, the weather might be too wet or cold to install your bees the same day they arrive. In this case, simply keep them in a cool basement or dark room and spray them with sugar water 3-4 times a day. They will usually be fine for a few days if you have to wait. Some dead bees on the bottom of their package is common. An inch or two of dead bees might be a problem, indicating they did not withstand the trip well. Call your supplier and report the findings.
If you see a few bees on the outside of your package, do not panic. It does not usually mean there is a leak. It usually means that a few bees have been clinging to the outside of the package for thousands of miles. But do check to make sure the box is sealed well.
Will the bees in the package sting you? Honeybees can always sting. However, you will find that by spraying them with sugar water, they are very calm. And, since they do not have any brood or honey to protect, they are not trying to defend their hive. Technically they don’t have a queen either. Their morale is low, so they are not aggressive at all. When I install packages, I do not wear cloves or hat and veil. I would not recommend it to you, because you don’t want a bad experience on your first installation, but you will find the bees to be very gentle. Work with confidence! This lesson continues.
<
Now, here’s how you can effectively install your bees in your new hive. Choose a good time of the day, when it is sunny, warm and not too windy. Mid to late afternoon works well. Be sure and take all your equipment to where you will install your package. You will need the following items:
1) Spray bottle with sugar water (1:1 ratio)
2) Hive tool
3) A wood screw (for removing queen cage cork)
4) A comfortable amount of protective clothing
5) A rubberband
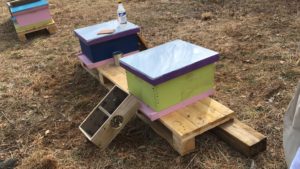
Be sure your new hive equipment is where you want your hive to be. At this point, you will only need your bottom board, 1 deep hive body, 10 frames and foundation, inner and top cover. Remove 4 of the center frames from the new hive body. This is where you will shake your bees into. Spray all 10 frames, both sides, with the 1:1 sugar water mixture. This will attract the bees to the foundation and give them a warm welcome to their new home. Bees love sugar!
Also, before you install your package, you’ll want to insert your entrance feeder and entrance reducer. Bees need fed when first installed because they are not an operational hive just yet. They have no incoming food. So feed them for a couple of weeks the same mixture of 1:1 sugar water. It is easier to place the entrance feeder in the front of the hive when there are no bees inside.
You will want to insert the entrance reducer before installing your bees. This will keep the bees snug in their new home, and alleviate any tendency for the new bees to fly away. Yet, it does leave enough space for them to fly in and out as they become acquainted with their new home. Position your entrance reducer cleat in the front of your hive. After 3-4 days, you can remove it entirely until winter. This step is important because occasionally packages can fly away after you install them. This restriction will help tremendously. While the chance of your new hive flying away is VERY RARE, the possibility does exist. The reducer will help. They will stay put better than you would think. Do not fear that they are flying away because you see lots of bees flying around. This is normal. They need to stretch and go to the bathroom after traveling so far. Bees do not go to the bathroom inside their hive. They are very clean.
Now, spray the package thoroughly on both sides of the screen, front and back. This will calm the bees, keep them well-nourished and keep them from flying about so much during the installation process. Remember, you cannot over-spray. Be prepared for sticky hands and fingers.
Now, you will want to begin opening your package. Do not be afraid. Millions of bees are not going to rush out at you. Work with confidence and enjoy the activity.
 To open the package, first remove the top panel. It is stapled on to the box. Staples are sharp, so don’t cut yourself on the staples once the panel is removed. Use your hive tool to pry open the panel. But, be careful with your hive tool. The end is very sharp too, and if the tool should slip, it can poke or cut you.
Once you remove the top panel, NO bees will come out yet. This panel simply holds the feeding container in place as well as the white strap that has the queen cage on the opposite end, inside the package.
The bees may become noisy which is normal. Spray them again if you need to calm them. They are becoming loud not because you are making them mad, but simply because of the sunlight and air. They are ready to do what bees do. Make a hive and gather nectar. Stay calm and confident!
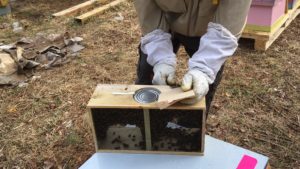
Now you see the top of the tin can of sugar as well as the white queen cage strap. The queen cage strap is also stapled to the top of the box. Free this strap, but do not let it fall into the package of bees.
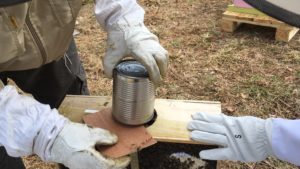 Once you are ready, pull the can out and set it aside. At this point, the bees will have access to the great outdoors, so cover the opening with the piece of wood that was just removed.
Now you will need to remove the queen, do so by removing the staple on the white plastic strap and gently pulling the queen out. Some bees will come out with her, but you can cover the hole again.
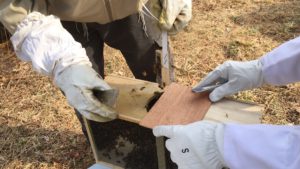
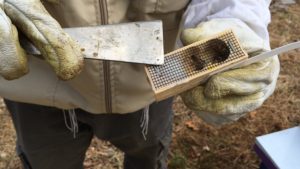 Check if the queen is alive and well,
Now you must install your queen. Slow release method is the best. These are not her bees, and she is not the queen they are used to YET! So, you must let them get to know her before she can roam freely among her new hive. Here’s how. The queen cage has a screen on top and through the screen you can identify a white candy substance at one end. This is the end that you will HAVE TO remove the cork. DO NOT REMOVE THE CORK AT THE OPPOSITE END OF THE CANDY. Only remove the cork from the candy end of the cage. A hive tool doesn’t work well, but screwing in a small screw then pulling it out works well. Once the cork is out, you will see that the hole is still plugged with the white candy. GOOD! Do not disturb that candy plug. As the bees eat through the candy, they will become familiar with their new queen. Then, once the candy has bee eaten, she will emerge from her cage as queen of the hive and be readily accepted by her new workers. After all, they are ready for a queen themselves!
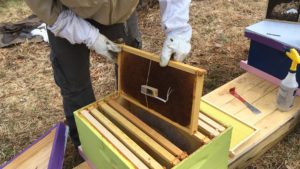
Once you’ve removed the cork, you will want to place the cage between the frames in the center of the hives from the top. You can use the pressure of the hive frames to hold the cage between the frames or you can use a rubber band to keep her in place. I hang my queen cage with the candy side down. Some say to hang it with the candy up, in-case her attendant bees within her cage die, they do not block her exit. However, bees are good about moving dead bees out of the way, and I want her to exit out onto the foundation.
Once the queen is set in the hive, you are ready to shake the bees in.
Spray the bees again with sugar water, bang the box down, open the cover and begin shaking your bees out of the package and into the new hive.
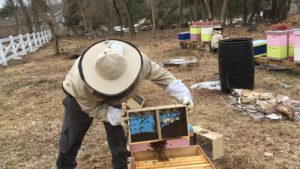 Shake as hard as you want and you’ll start seeing them pour into the new hive. You may also want to firmly strike the side of the package with the palm of your hand to free bees that are hanging on to the screen. However, be sure not to strike a bee when striking the side of the box or you might smash a bee just enough to get stung.
Once they are all shaken in gently replace all the frames back inside the hive.
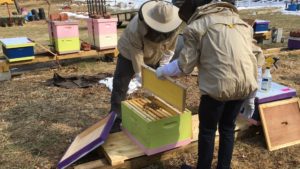
PLAY CLOSE ATTENTION. YOU MUST REPLACE ALL 10 FRAMES!! If you don’t, the bees will quickly make comb in place where your frames should have gone. This will be a mess. And they will attach their comb to your top cover and if you wait long enough, you will not be able to open your hive. SO YOU MUST REPLACE ALL 10 FRAMES before replacing the inner and top cover.
 The bees will need food so take advantage of the remaining sugar water in the tin can by placing if over the entrance feeder. I usually poke a few more holes with a nail so the bees will consume it more quickly. After it is finished, I replace it with a mason jar with holes in the lid.
Do not place any other boxes on the hive just yet. You only need the one deep box. Let them draw out the comb, usually 6-8 frames, then you can place your second hive body on top. Once 6-8 frames of your second deep have been drawn out, you can start placing your supers on.
Great Job! You Did It!! Place the package box near the front of the hive because it will still have some bees that you were unable to shake out of it. These will find their way into the hive in a day or two.